

Empowering Website Conversations: Conclusion

Empowering Website Conversations: Part 7
Introduction
Throughout this seven-part series, we’ve embarked on quite the journey. We began by extracting training data from our website content, proceeded to fine-tune OpenAI models, and implemented both a reusable REST API and a dynamic UI for our chatbots. In this final installment, we’ll integrate our chatbot UI into our existing website. Moreover, we’ll dedicate time to delve into the ethical considerations surrounding the training and deployment of our AI chatbot, aligning our journey with responsible AI practices. Stay tuned for the culmination of our exciting adventure!
The previous section can be found here.
Website Integration
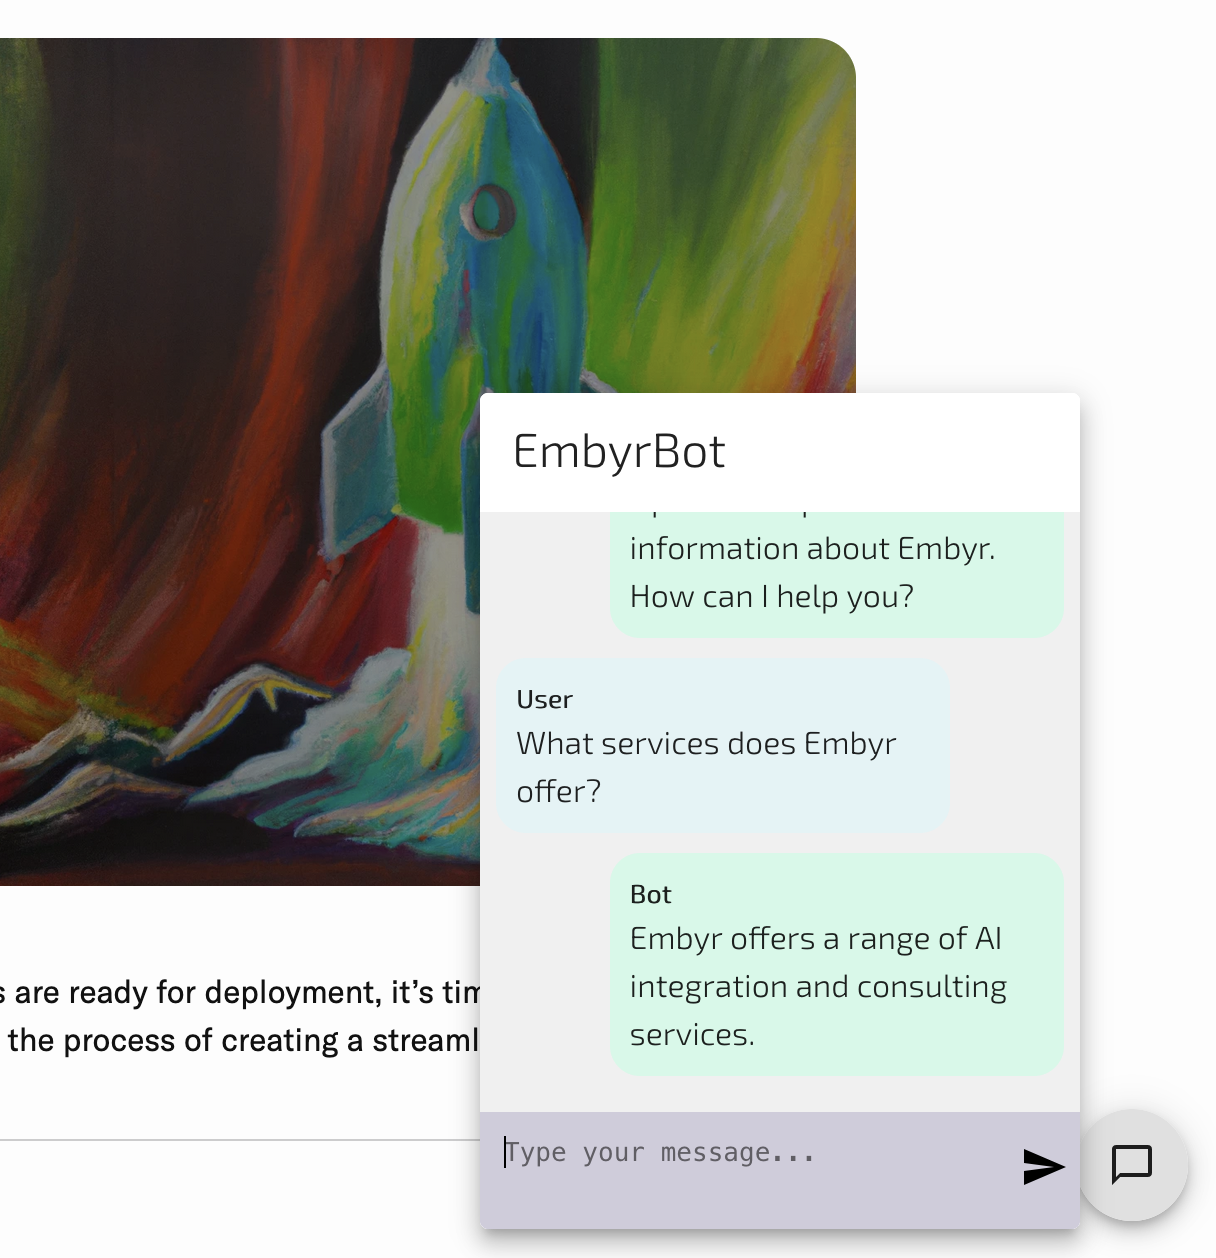
We finally have our chatbot and the last step is to integrate the UI with our existing website. Our current website is a static website built with Jekyll and markdown files. To integrate our React application, we are going to use an iframe and include the chatbot on every page. The following solution assumes you have your chatbot UI and REST API already deployed.
For more information about Jeykll, take a look at their documentation.
In includes/chatbot.html, we have:
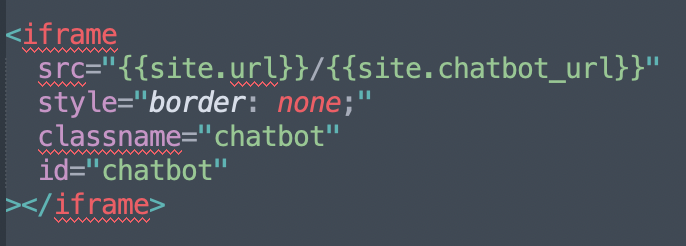
Where the url and chatbot_url come from the _config.yaml. The URL will
need to be manually added and should include the parameters for the UI:
- chat_url: The URL of the running chat REST API.
- greeting: An Embyr chatbot greeting.
- title: An Embyr chatbot title.
chatbot_url: "chatbot-ui?chat_url=http%3A%2F%2F127.0.0.1%3A8000%2Fchat&greeting=Hello!%20I%20am%20a%20ChatBot%20created%20by%20fine-tuning%20OpenAI%20completions%20on%20information%20about%20Embyr.%20How%20can%20I%20help%20you%3F&title=EmbyrBot"
To the _layout/base.html add near the bottom of the body:

One issue I ran into was properly formatting the iframe to take up the correct
amount of space on the page when collapsed and expanded. To fix this, I added a
postMessage
that would set the required size of the iframe to the website on open or close
of the dialog. To do this, I added the following useEffect to ChatDialog.tsx
in our chatbot UI application:
useEffect(() => {
  if (!open) {
    window.parent.postMessage(
      {
        type: 'setSize',
        style: { height: '100px', width: '100px' },
        timeout: '500',
      },
      '*',
    );
  } else {
    window.parent.postMessage(
      {
        type: 'setSize',
        style: { height: '450px', width: '390px' },
        timeout: '0',
      },
      '*',
   );
  }
}, [open]);
And in the _layout/base.html file of our website I added the following script
that edits the style of the iframe:
<script>
window.addEventListener('message', (event) => {
  setTimeout(() => {
    if (event.data.type === 'setSize') {
      const iframe = document.getElementById('chatbot');
      Object.assign(iframe.style, event.data.style);
    }
  }, event.data.timeout);
});
</script>
The default size of the iframe is defined with the following CSS:
.floating-iframe {
  position: fixed;
  bottom: 0px;
  right: 0px;
  z-index: 9999;
  /* Default iframe to not being displayed until we can check the url */
  display: none;
}

.floating-iframe iframe {
  width: 100px;
  height: 100px;
}
Note the floating-iframe is not displayed by default. We do not want to display
the chatbot UI on the website if we know that it is not available.
Unfortunately, different browsers handle onload for iframes inconsistently.
To work around this issue, I added an onload to the body defined in the
base.html file.

The handleIframeLoad(iframe_url) function will check if a HEAD request can be
successfully returned by the chatbot, and update display: block. Otherwise,
it stays none.
function handleIframeLoad(iframe_url) {
  var iframe = document.getElementById('floating-iframe');
  fetch(iframe_url, { method: 'HEAD' })
  .then(function(response) {
    if (response.ok) {
       iframe.style.display = 'block';
    } else {
      console.warn('Unable to access iframe URL, removing chatbot');
      iframe.style.display = 'none';
    }
  })
  .catch(function(error) {
    console.log('An error occurred during the HEAD request, removing chatbot:', error);
    iframe.style.display = 'none';
  });
}
And that’s it! We have now integrated our chatbot into our website.
Improvements
The current chatbot is sufficient for our use case but what if you wanted to improve the conversation? Here are steps that can be taken:
-
The existing models can continue to be trained. In the old fine-tuning process, OpenAI suggested that each doubling in size of the training data set provided a linear increase in performance quality. Assuming this is still true for the new process, this could be done by storing conversations to mine for more training data. If you choose to do this, make sure it is clear to the users their questions may be used for future training.
-
Include the full conversation in the prompts so the completion can build on the full conversation. Currently, we are only sending one question at a time within the prompt and the chatbot has no “memory” of what has already been asked. Including a summary of the conversation in the prompt will allow for the chatbot to respond with better context but will be more expensive as more tokens will be required. Changes to training would also be required to match this format.
{"messages": [ { "role": "system", "content": "You are a factual chatbot to answer questions about AI and Embyr." }, {"role": "user", "content": "<QUESTION 1>"}, {"role": "assistant", "content": "<ANSWER 1>"}, {"role": "user", "content": "<QUESTION 2>"}, {"role": "assistant", "content": "<ANSWER 2>"}, ]} -
Use better starting models. We used
gpt-3.5-turbo-0613as the base model, the best current option. Soon fine-tuning will be available for GPT-4 and GPT-3.5-Turbo-16k models.
Ethical Considerations
Creating a chatbot with human-like conversational abilities underscores the importance of transparency in all AI applications. Several key ethical considerations must be carefully addressed during the creation and deployment of your chatbot:
Transparency
Disclosure: It’s paramount to be forthright about the chatbot’s identity, explicitly indicating that users are interacting with an AI chatbot, not a human. This is why our introductory message explicitly states that this is a chatbot powered by OpenAI’s fine-tuned models.
Limitations: Clearly define the chatbot’s capabilities and limitations to set accurate user expectations.
Privacy and Data Security
Data Collection: Avoid unnecessary data retention. If there are plans to store conversations for future training, this intention must be explicitly communicated, and users should have a clear and accessible opt-out option.
User Consent
Opt-in/Opt-out: Ensure that user engagement with the chatbot is voluntary, allowing users to opt-in or opt-out of interactions. It’s vital, however, to provide alternative means for users to access information about Embyr, beyond the chatbot.
Accuracy and Improvements
Correct Information: Guarantee the chatbot provides precise and current information regarding your company’s products, services, and policies. Rigorous testing and ongoing retraining are necessary to maintain accuracy and user trust.
Addressing these ethical considerations helps ensure that your chatbot not only delivers a valuable user experience but also upholds transparency, privacy, and accuracy in its interactions with users.
Conclusion
And that’s it. We have walked through all the steps required to create a custom chatbot that can help users discover more information about our website. Fine-tuning in OpenAI empowers developers to create specialized, efficient, and cost-effective language models tailored to their specific needs, accelerating the development of AI-powered applications. The same process can be followed to create your own ChatBot on any subject!
Part 1: What are Chatbots, and why would I want one?
Part 2: From Markdown to Training Data?
Part 3: Fine-tune a Chatbot QA model
Part 4: Safeguard your Chatbot with Discriminators
Part 5: Develop your Chatbot REST API
Part 6: Bring our Chatbot to Life: The User Interface
For more information about fine-tuning and other examples see OpenAI Fine-tuning documentation.